As a remote worker I often work away from a proper desk and don’t have access to a real mouse. In fact, after over 6 years of working remotely, I don’t even use a mouse when I am work at home. Which is why I love a good trackpad.
The Lenovo Yoga Pro 2 is a wonderful laptop with a great trackpad. However, there were a couple of things I wanted from it that the Synaptics settings couldn’t configure, even though they were supported by the driver. I am writing this post so in the future when I do the inevitable reinstall, I have instructions for getting back into a good state.
Get rid of fake buttons
I am used to working with trackpads that have “real” buttons. Unfortunately, the Yoga turns the bottom quarter of the trackpad into fake touch buttons. The problem with these fake buttons is that I never know which one I am going to press unless I look. After months of working with the Yoga, I was still right-clicking most of the time and it was driving me insane.
Follow the steps below to do away with the buttons and reclaim the full trackpad:
Open Regedit
Navigate to HKEY_CURRENT_USER\Software\Synaptics\SynTP\TouchPadPS2
Set ExButton4Action to 1 (By default it will be 2)
How to right-click again?
So without the fake buttons there isn’t an obvious way to right-click. In the Synaptics settings you can set up right-click on two finger click, but who has the strength for that? What we really want is right-click on two finger tap.
Follow the steps below to get right-click on two finger tap:
In Regedit
Navigate to HKEY_CURRENT_USER\Software\Synaptics\SynTP\TouchPadPS2
Set 2FingerTapAction to 2
Set 2FingerPressButtonAction to 2 (If you want the right-click on two finger click)
I have 3 fingers; Can I use them for something?
As an ex-mouse user I enjoyed using the middle mouse button to open links in new tabs, wouldn’t it be nice to get a middle-click on 3 finger tap?
Follow the steps below to get middle-click on three finger tap:
In Regedit
Navigate to HKEY_CURRENT_USER\Software\Synaptics\SynTP\TouchPadPS2\3FingerGestures
Set ActionID0 to 12 hex
Set PluginID0 to SynTP
Navigate up to HKEY_CURRENT_USER\Software\Synaptics\SynTP\TouchPadPS2
Set 3FingerTapAction to 4
Set 3FingerTapPlugInActionID to 0
Clear the value in 3FingerTapPlugInID
Time for a reboot
After making the registry changes you will need to reboot for them to take effect. Beware, I have noticed that if I use the Synaptics settings tool to make further tweaks, some of the registry changes get reverted, so keep these steps handy.
Asfac is a simple IoC container for ActionScript and this is the story of how it came into being.
Genesis
It is all Jon Skeet’s fault really. I rediscovered this gem of a video he recorded with Rob Conery for a series on TekPub. In the video Jon creates a functioning IoC container in matter of minutes.
I was unfamiliar with the concept of containers at the time, but the basics looked simple enough. So I set out to learn more by implementing a container for ActionScript. Why ActionScript you might ask? I wanted to explore the concepts without directly copying Jon’s code. My first stab at the container lives as a gist and is a pretty straight port of Jon’s code. A good start perhaps, but I wanted better.
Work in Progress
Asfac represents my first project written with a TDD approach and an excuse to try out new development processes. After getting Dave on board, we paired going back and forth one writing a failing test; the other writing the code that would make it pass. This went on for a while until we had gotten the equivalent of Jon’s container working in ActionScript. I was excited. Not only did TDD keep me very focused on individual requirements but pairing was great for keeping me on task.
With a functional container written, Dave wanted to see how far we could push it. He had already been using containers in his .NET work and wanted to bring some sugar over. So we started making our wish list of functionality; things like a fluent interface, scoped registration, and property injection.
We then entered all this information into GitHub. We took advantage of the issue tracking for logging bugs and enhancements, worked in feature branches during development, and issued pull requests for the other to code review. Basically what I consider to be a healthy development process.
Stick in the Mud
With development of all the functionality wrapping up there was only one task left to accomplish, Documentation. We knew that asfac certainly didn’t need a book to use, but it did need to be documented. Dave opened an issue and created a branch. He reorganized the sample code in the read-me this time with better descriptions. We started reviewing the API documentation in the AsDoc comments and then it all stopped. Months passed with a releasable version of asfac sitting around waiting to be documented.
The new year has a way of stirring some self reflection. Over the winter break I started making a mental list of where I could improve over the next year. One area that seems to be on every year’s list is ‘finishing’. Why wait another year to see if I could get better at it? Start finishing now!
I cloned the asfac repository and gave it a proper review. I standardized things like comments being in sentence structure not as fragments, fixed variable names that had long since changed in the code, and pushed it all up to GitHub for a final look over. It only took a week to sync up with Dave and get it all merged into master.
Wrap up
So it took a while but we are at v1.0. We finished something we started. Success! So if you are using ActionScript and have need of an IoC container, then please take us into consideration with all the others and let us know how we stack up.
Recently I was in charge of replacing the JSON serializers being used in an existing project to squeeze out a little better performance. I looked at a couple libraries for .Net and settled on the almost ubiquitous JSON.Net. This decision felt even more right after it was announced that JSON.Net will become the default serializer for ASP.Net.
A few thoughts were guiding me in this process:
– I am not intimately familiar with JSON.Net
– I didn’t have a lot of time to become familiar with it
– I had lots of code in the project that used the serializer directly
– I need to port several JavaScriptConverters over to equivalent JSON.Net JsonConverters
With this in mind, I choose to abstract out the differences instead of attempt a wholesale rewrite. The first task was to create a set of interfaces that roughly resembled the JavaScriptSerializer and JavaScriptConverter classes.
Next, I made a JSON.Net JsonConverter that will wrap my existing converter classes that now implement IJsonConverter. It handles serializing and deserializing into a Dictionary before passing off to the legacy JavaScriptSerializer code.
Since I needed to get up and running fast, I borrowed the ExpandoObjectConverter class from JSON.Net and tweaked it to build out a Dictionary instead. I could then invoke the IJsonConverter class to take the serialization the rest of the way.
publicclassNewtonsoftJsonConverter:JsonConverter{privateIJsonConverter_converter=null;privateIJsonSerializer_serializer=null;publicNewtonsoftJsonConverter(IJsonSerializerserializer,IJsonConverterconverter){_serializer=serializer;_converter=converter;}publicoverrideboolCanConvert(TypeobjectType){foreach(Typetypein_converter.SupportedTypes)if(type.IsAssignableFrom(objectType))returntrue;returnfalse;}publicoverrideobjectReadJson(JsonReaderreader,TypeobjectType,objectexistingValue,JsonSerializerserializer){objectvalue=ReadValue(reader);if(value==null)returnvalue;if(!(valueisIDictionary<string,object>))thrownewException("Expected dictionary but found a list");value=_converter.Deserialize((IDictionary<string,object>)value,objectType,_serializer);returnvalue;}privateobjectReadValue(JsonReaderreader){while(reader.TokenType==JsonToken.Comment){if(!reader.Read())thrownewException("Unexpected end.");}switch(reader.TokenType){caseJsonToken.StartObject:returnReadObject(reader);caseJsonToken.StartArray:returnReadList(reader);default:if(IsPrimitiveToken(reader.TokenType))returnreader.Value;thrownewException(string.Format("Unexpected token when converting to Dictionary: {0}",reader.TokenType));}}privateboolIsPrimitiveToken(JsonTokentoken){switch(token){caseJsonToken.Integer:caseJsonToken.Float:caseJsonToken.String:caseJsonToken.Boolean:caseJsonToken.Undefined:caseJsonToken.Null:caseJsonToken.Date:caseJsonToken.Bytes:returntrue;default:returnfalse;}}privateobjectReadList(JsonReaderreader){IList<object>list=newList<object>();while(reader.Read()){switch(reader.TokenType){caseJsonToken.Comment:break;default:objectv=ReadValue(reader);list.Add(v);break;caseJsonToken.EndArray:returnlist;}}thrownewException("Unexpected end.");}privateobjectReadObject(JsonReaderreader){IDictionary<string,object>dictionary=newDictionary<string,object>();while(reader.Read()){switch(reader.TokenType){caseJsonToken.PropertyName:stringpropertyName=reader.Value.ToString();if(!reader.Read())thrownewException("Unexpected end.");objectv=ReadValue(reader);dictionary[propertyName]=v;break;caseJsonToken.Comment:break;caseJsonToken.EndObject:returndictionary;}}thrownewException("Unexpected end.");}publicoverridevoidWriteJson(JsonWriterwriter,objectvalue,JsonSerializerserializer){IDictionary<string,object>dictionary=_converter.Serialize(value,_serializer);serializer.Serialize(writer,dictionary);}}
Lastly, I needed to wrap the JSON.Net serializer within my IJsonSerializer interface so that my existing code can get all the benefit of its performance with little changes in my code.
After changing a few import statements I was ready to go. Testing showed a particular server query that had been taking close to 2 minutes to return would now return in under 30 seconds consistently. This was certainly a huge win considering it required a very small set of changes to the project’s code.
Overall the process went smoothly and I am very happy with the result. If you would like to use this code yourself, it is available as a Gist on GitHub.
Probably not the kind of library you were expecting, but one that I find to be pretty handy.
Windows Libraries
A new feature in the much derided Windows Vista was the ability to group folders of like content into libraries. Vista and Windows 7 come pre-loaded with Documents, Music, Picture, and Video libraries. Today we are going to step through making a Source library.
If you are anything like me and I suspect a number of you are then, you have code scattered all across your hard drive. You could move all that source into one folder under Documents and be done with it. However, there are times when you just cannot move the source. Creating a library is a way of managing the clutter.
Create the library
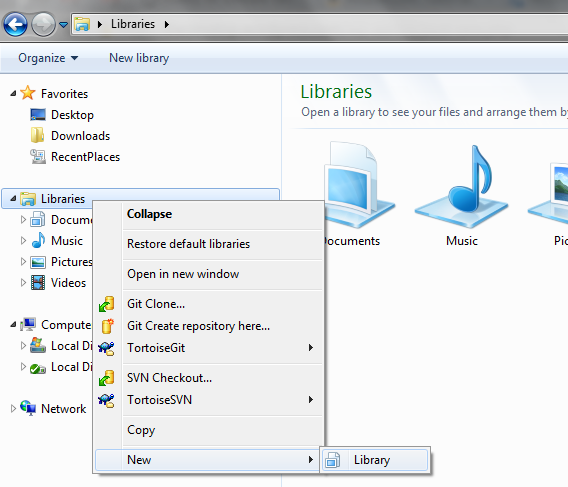
First, let us press Windows + E to open Explorer. Right-click the Libraries folder. Go to New, then click on ‘Library’.
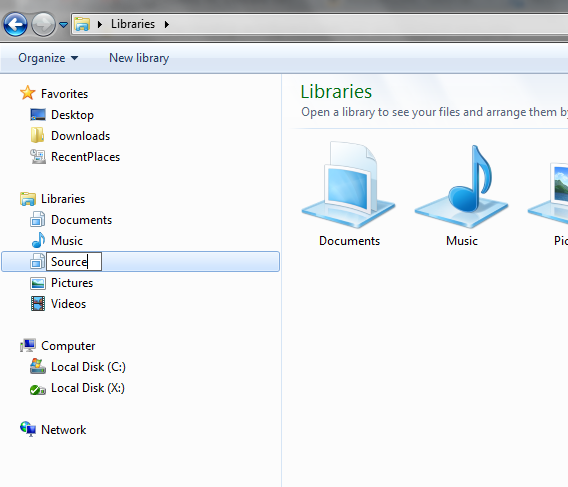
Let’s name it Source..
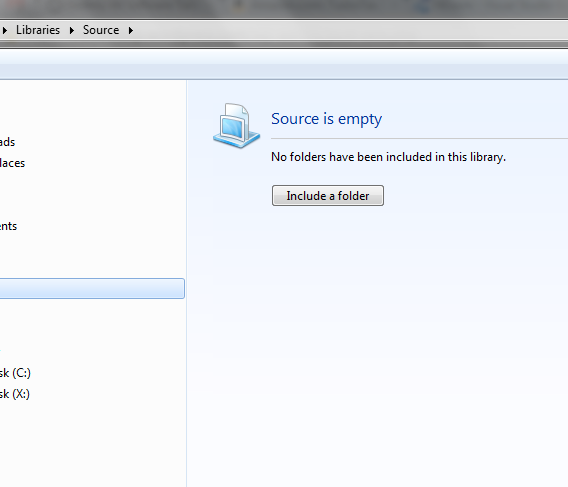
Click on it. As you can see there is not that not much going on yet.
Including your source folders
Now we will go through and add all the source folders from your hard drive.
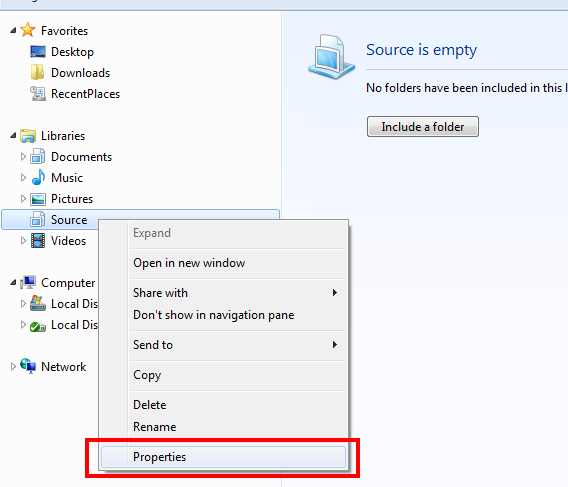
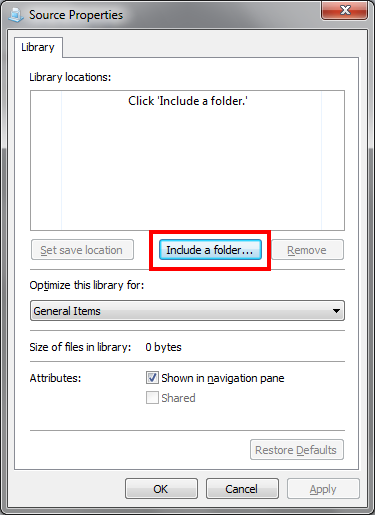
Right click the Source library and click on ‘Properties’.
Click on ‘Include a folder…’ and start adding all your source folders.
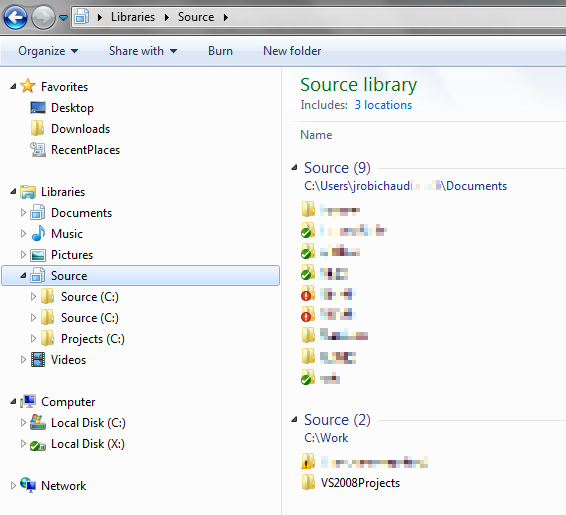
After adding my various code cubbyholes my properties looks like this..
Note that by default the first folder added becomes the ‘save location’. This is the folder that files are stored in when the Source Library folder is selected. If you want to change the default select the folder you want to become the save location then, click the ‘Set save location’ button.
Clean house accomplished!
Yay! Everything is all in one place now. Too bad Windows doesn’t detect included folders with the save name and display more of the path.
I hope you found this useful or at least stopped reading before I wasted too much of your time. =p
I was reading my twitter feed the other day and saw this exchange come through…
and I couldn’t agree more. So I decided to do something about it!
Getting to know Greasemonkey
I remember hearing about Greasemonkey scripts back in Firefox’s heyday. According to Wikipedia, Greasemonkey “… allows users to install scripts that make on-the-fly changes to HTML web page content …” Even better than that, Google Chrome treats the scripts as extensions right out of the box.
Of course, I have never written a Greasemonkey script so, I went to the worlds repository of these scripts, Userscripts.org. Right off the bat, Userscripts made it super easy to get my bearings; they allow you to view the source of existing scripts right in the browser.
My next stop is over at github to figure out what CSS I need to replace.
Github’s CSS
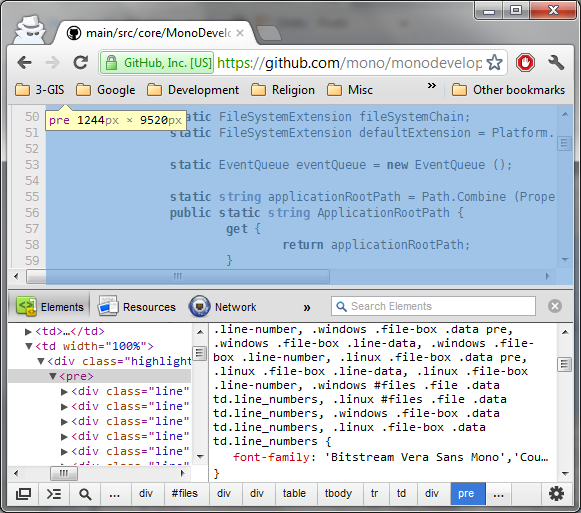
Alright, time to use those F12 tools! I browsed over to the MonoDevelop project on github and inspected the element that contained source code.
Great! Now I know the CSS selectors that I need to override. With this knowledge in hand I started my first user script.
First, I borrowed a bit of code for injecting a new style elements into the page head. I then copied the CSS for github’s pre element over to my script and added Consolas to the beginning of the font family definition. Just like that, I had the first version of my script.
Bringing it together
I created an account on Userscripts.org and navigated to script management. Uploading was as simple as pointing to my script file and filling out some metadata about the script. Time to see it in action!
The finish line!
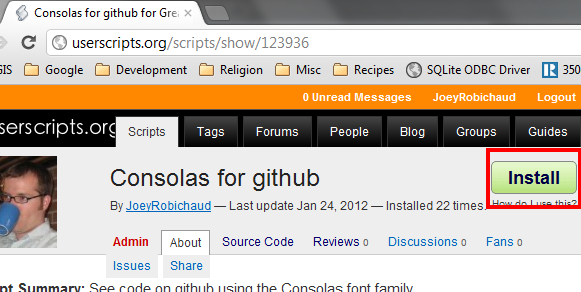
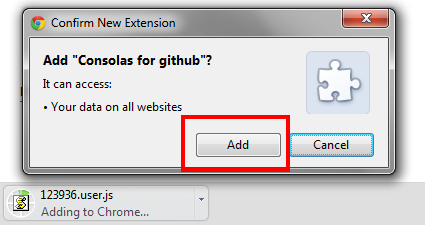
I went to the Consolas for github script page with Chrome and clicked the install button.
Followed the prompts..
.. and Success!
After some twiddling, I get the in-browser editor using Consolas as well.
Install it. Enjoy it. Remix it. Please just don’t make Comic Sans for github.
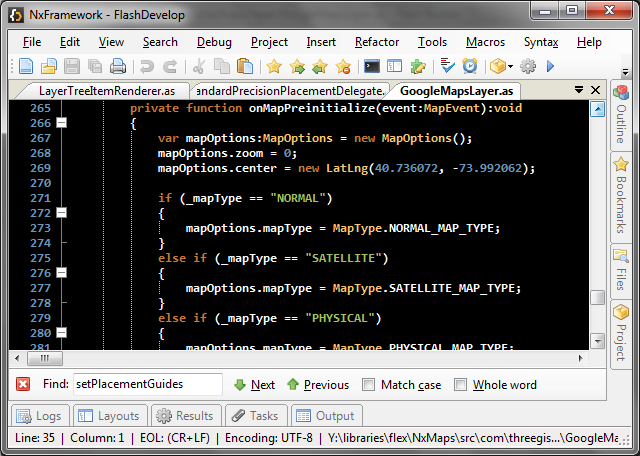
At work consummate developer Josh Rogers got FlashDevelop working with a custom ant build script as a replacement for FlashBuilder. This is great news because FlashDevelop is using less than a tenth of the memory resources that Adobe’s Eclipse-based FlashBuilder uses; You should check it out if you are in Flex-land like me.
Now since the first thing I do whenever I start using a new IDE is move over my favorite syntax colors (see also VibrantInk for FlashBuilder and VibrantInk for Notepad++), I am once again giving you the fruits of my labor.
It’s glorious and it is all yours, if you click here!
Let me start by saying that I know notepad++ comes with a Vibrant Ink theme. It is likely much, much more accurate and if you love TextMate for Mac you should probably use it. However, this theme is based on the VibrantInk theme for FlashBuilder and thusly on the Visual Studio theme that inspired it.
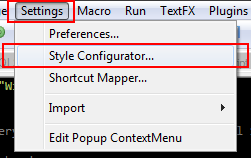
To install simple copy the VInk.xml into %PROGRAMFILES%\Notepad++\themes and restart notepad if it is open. You can change your theme from the Settings > Style Configurator… dialog.
Where it says Select Theme, simply choose VInk.
I have loaded sample code from several languages with it and am satisfied I caught the spirit of the theme. If you want you can download it here.
I am new to the concept of migrations but am really liking the whole concept.
“Migrations represent a “non-violent” way, basically, to transition the schema of your database as your app grows.“ – Rob Conery from ”Musing on Simpler Migrations”
Having seen the way a schema grows after several releases of a product it can be a lot to manage. Traditionally, I have kept a folder of scripts for a clean install and a folder of scripts for upgrading from previous versions. However this approach requires testing and verification that there is rarely time to perform in the environment that I currently find myself. Did I mention that we also have to keep all the scripts in an Oracle and SQL Server flavor? Egad!
After fighting with this for a few years, it was time to take a step back and evaluate my options. Two things happened that helped me forge a new path. The first is that I came across Rob Conery’s blog and in particular the Manatee tool that he has written. Rob has been bringing the best of what the Ruby world has to offer to .Net developers as part of his TekPub series “Hacking WebMatrix”. The second was the announcement of a new version of SQL Server CE that supported multi-threaded web environments. By delivering a database solution we were no longer bound to support any platform our customers happened to be using.
Now that we have a plan let us see how it all fits together.
Using Manatee
Step one is to visit GitHub and pick up the latest cut of Manatee. If you are unfamiliar with Git you can download a zipped package of the source by clicking on ‘Downloads’. Once you have pulled the repository or unzipped the source, double click Manatee.sln to open Visual Studio. Press F5 to build and you have a command line tool to manage your databases schema.
“Sounds great but how do we build up the schema?”, you ask. Enter the migrations file.
Manatee uses a JSON object as the medium for describing each migration. Each file contains a definition of how to move the schema up and down a version. These definitions are found in the ‘up’ and ‘down’ properties of the migration’s JSON object. In simple cases, such as creating a table and adding a foreign key, the DOWN can be inferred from the UP and is not required. Each migration file contains a single change to the database. A single change being altering a field name, or adding a foreign key constraint. A migration file can also contain an execute script allowing up to insert default values into the database.
The above will create a new table named Project. There is an implied primary key named Id. Since I set the timestamps flag to true, fields for tracking created and updated dates will also be created automatically.
Making Manatee work with SQL Server CE
I ran into a few snags when building my database with Manatee. Luckily we have the source and are free to make changes as needed.
One issue I ran into is that Manatee will not create a SQL Server CE database for me. I could use the SqlCE Toolbox in Visual Studio but that just seems like too much work for me.
The first step to fixing this is to reference the SQL Server CE assembly in the Manatee project. I fired up NuGet and it quickly got me registered.
Next, I added a check to the SetupConnectionAndFactory method of the Migrator.cs. It looks at the DataProvider specified in the Manatee.config to see if we are using System.Data.SqlServerCe.4.0. If it is then, we will create a new database if we are unable to verify the connection string. (I am aware that there are several problems that will cause verification to fail other than simply not existing, but this will work for us for the time being)
privatevoidSetupConnectionAndFactory(stringconnectionStringName){if(connectionStringName==""){connectionStringName=ConfigurationManager.ConnectionStrings[0].Name;}if(ConfigurationManager.ConnectionStrings[connectionStringName]==null){thrownewInvalidOperationException("Can't find a connection string with the name '"+connectionStringName+"'");}varproviderName="System.Data.SqlClient";varconnectionStringsSettings=ConfigurationManager.ConnectionStrings[connectionStringName];if(!string.IsNullOrEmpty(connectionStringsSettings.ProviderName)){providerName=connectionStringsSettings.ProviderName;}_factory=DbProviderFactories.GetFactory(providerName);_connectionString=connectionStringsSettings.ConnectionString;if(providerName=="System.Data.SqlServerCe.4.0"){InitializeDatabase();}}privatevoidInitializeDatabase(){varengine=newSystem.Data.SqlServerCe.SqlCeEngine(_connectionString);if(!engine.Verify()){engine.CreateDatabase();}engine.Dispose();}
After setting this up I ran into an issue creating foreign keys. SqlCE does not support the WITH NOCHECK clause when adding the constraint. The offending code is in the GetCommand method of the Migrator class. One small edit later and now I can add constraints.
It seems that Manatee is envisioned to run from bin/debug. It looks for the Migrations folder two levels up from the current directory. I can see why you might want to leave it this way, but I would prefer for the Manatee to run in the same directory as the Migrations folder.
We need to update the LocateMigrations method in the Program class. We will change it to use the current directory instead of the it’s grandparent.
1234567
staticstringLocateMigrations(){//this is the current directoryvarcurrentDirectory=newDirectoryInfo(Directory.GetCurrentDirectory());//return the Migrations directoryreturnPath.Combine(currentDirectory.FullName,"Migrations");}
Time to Get Started
With that change I am done for now. Manatee creates SqlCE databases and foreign keys now. I still need to put it through it’s paces, but I think I have a good start.
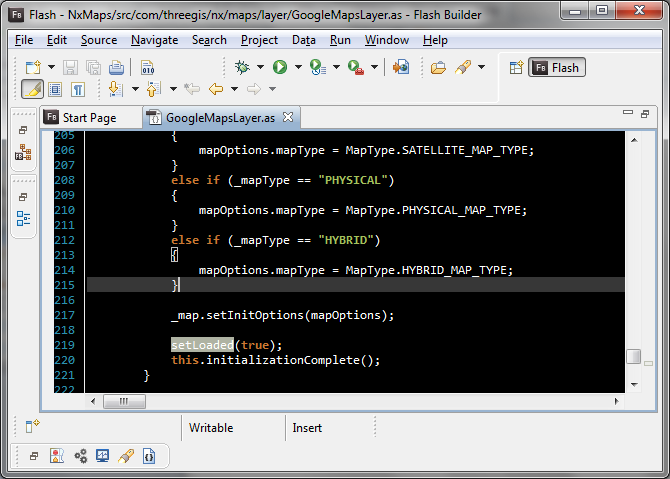
Yesterday I mentioned that I don’t care for Visual Studio’s default theme color choices, that I much prefer Rob Conery’s VibrantInk. Well I don’t care for FlashBuilder’s defaults either. So, I give you VibrantInk for FlashBuilder 4.5.
Some parts of the highlighting did not port well since FB does not support semantic highlighting, but all in all it is pretty faithful. Just drop the contents of this zip file in your {workspace}.metadata.plugins\org.eclipse.core.runtime.settings folder and restart FB if it is running.
On several occasions I have presented topics to my team during our monthly lunch and learns. These presentations almost always include code samples and complaints about font size. Although I had read, I have never taken Scott Hanselman’s advice for preparing for a screencast. Most of which are applicable when presenting.
“Use the standard Visual Studio Font Colors… change your fonts to Consolas Size 15.”
Oh no! I haven’t used the default Visual Studio theme since I ran across Rob Conery’s Vibrant Ink theme (which should be shipped as the defaults IMHO). It would be nice if Visual Studio made it simple to switch between various configurations on the fly.
Then last week I saw this tweet come through my feed.
That’s it. I decided that today was the day for change. Jeff Handley’s macros make it dead simple to go from development to presentation mode on the fly.
There are just a few things that I wanted to tweak. First, I found switching to presentation mode took too long, and I thought it would be simpler to just change the font size. Second, I wanted to be able to switch between the default theme and my theme quickly and without affecting font size.
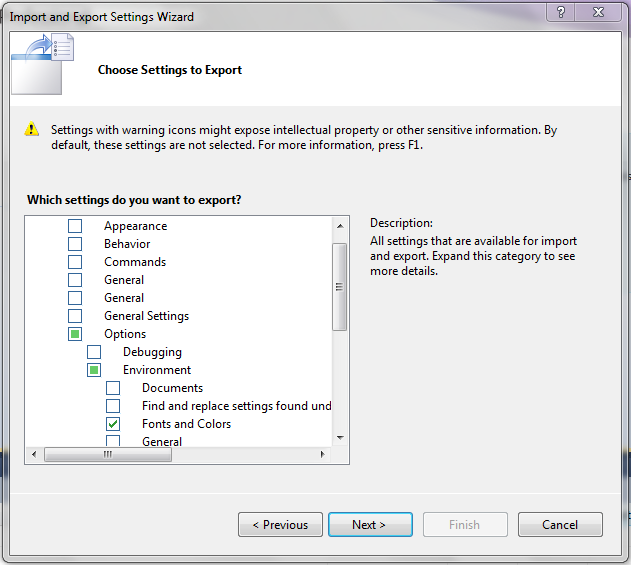
With this in mind, I needed to export the default Visual Studio colors and the Vibrant Ink themes. To make switching themes short, I only exported Options > Environment > Fonts and Colors.
Next, I launched Tools > Macros > Macros IDE… and got to work. Using Jeff’s macros as the base I started making my changes. So instead of loading settings for presentations, I made the macro toggle the font size between 10 and 15. When applying a change to the theme I made sure to remember the current font size and set it back after loading either the default theme or my own. Although I struggled a bit with the Visual Basic syntax, it wasn’t long until I was finished.
ImportsSystemImportsEnvDTEImportsEnvDTE80ImportsEnvDTE90ImportsEnvDTE90aImportsEnvDTE100ImportsSystem.DiagnosticsPublicModuleSettingsPrivateConstFONT_SIZE_CATEGORYAsString="FontsAndColors"PrivateConstFONT_SIZE_PAGEAsString="TextEditor"PrivateConstFONT_SIZE_NAMEAsString="FontSize"PrivateRootFolderAsString="[Your Root]\Documents\Visual Studio 2010\Settings\"PublicSubImportDefaultSettings()SetColorTheme("DefaultTheme")EndSubPublicSubImportCodingSettings()SetColorTheme("VibrantInkTheme")EndSubPublicSubTogglePresentationSettings()DimfontSizePropertyAsEnvDTE.Property=GetDTEProperty(FONT_SIZE_CATEGORY,FONT_SIZE_PAGE,FONT_SIZE_NAME)IffontSizeProperty.Value=15ThenfontSizeProperty.Value=10ElsefontSizeProperty.Value=15EndIfEndSubPublicSubImportKnRFormatting()ImportSettingsFile("KnRFormatting")DTE.ExecuteCommand("Edit.FormatDocument")EndSubPublicSubImportAllmanFormatting()ImportSettingsFile("AllmanFormatting")DTE.ExecuteCommand("Edit.FormatDocument")EndSubPrivateSubSetColorTheme(ByValfileNameAsString)DimfontSizePropertyAsEnvDTE.Property=GetDTEProperty(FONT_SIZE_CATEGORY,FONT_SIZE_PAGE,FONT_SIZE_NAME)DimfontSizeAsInteger=fontSizeProperty.ValueImportSettingsFile(fileName)fontSizeProperty.Value=fontSizeEndSubPrivateFunctionGetDTEProperty(ByValcategoryNameAsString,ByValpageNameAsString,ByValpropertyNameAsString)AsEnvDTE.PropertyForEachpropInDTE.Properties(categoryName,pageName)Ifprop.Name=propertyNameThenReturnpropEndIfNextEndFunctionPrivateSubImportSettingsFile(ByValFileNameAsString)FileName=IO.Path.Combine(RootFolder,FileName&".vssettings")DTE.ExecuteCommand("Tools.ImportandExportSettings","-import:"""&FileName&"""")EndSubEndModule
At this point, I threw together a toolbar and added the macros to it. They worked! Now I wanted to create some nice icons to use just like Jeff had done. It was when I was trying to apply them that disappointment crept in. Despite the documentation for adding macros to a toolbar, the comments point out correctly that you cannot assign a macro command an image. Bummer.
Maybe I don’t need a toolbar. I can just hook up the macros to some easy to remember shortcut chords. Click on Tools > Options… menu. Then browse to Environment > Keyboard. Type Macros.Settings into the filter box and we can start assigning.
Finding shortcut keys that weren’t already in use was a little frustrating, so I decided to go with “long, but simple to remember”. Using ctrl+alt+shift as the modifiers, my chords are s (for settings) then a, c, d, k, or p depending on which macro to launch.
Now I have no more excuses to use tiny code during my next presentation and if you follow these steps then neither will you. You can download my all of my vssettings, the macro file, and even the toolbar images I didn’t get to use here.